I am making it in a - probably poly - stash fabric in a teal/black heathered sort of weave.
Only after I had cut this out and found myself completely baffled by the first paragraph of instructions did I notice this pattern is rated 3.5 out of 4 dots in difficulty. I think now I have figured it out and am past the most confusing steps so I have taken some photos of the construction below in case it helps anyone. You may want to hold off taking any of my advice until the dress is actually finished though just in case....!
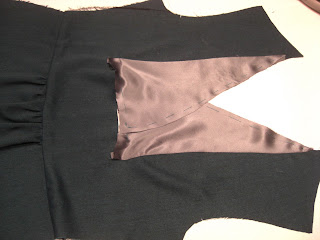
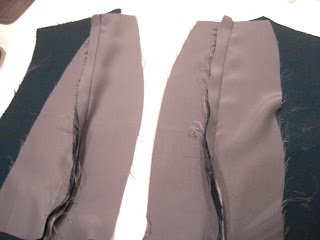
As an overview the dress is made up of a main body with an upper front and back overlay. Underneath that the dress bodice is partially made of lining material which is applied so that it sandwiches the raw edges of the centre front and back. Clear as mud? Thought so, here are the photos:
 |
| The back pieces should look like this after basting. |
 |
| The front pieces should look like this after basting. |
Stitch the shoulder seams, then you are ready to attach the overlay pieces. I suspect dealing with the corners is going to be a bit tricky, I'll take some photos during that stage too.


This is going to be gorgeous!
ReplyDeleteThe lines on this dress are amazing. I always hate the three month wait for Burda magazines as this is a dress I'd sew up quickly too.
ReplyDeleteI love this one too, and have been reading through the instructions trying to figure them out! Best of luck with it. I'll be watching carefully!
ReplyDeleteThe pattern is beautiful. Thank you for helping us all with the instructions. Looking forward to see how your dress turns out!
ReplyDeleteOh wow, you're fast! I think the dress you've picked is the universally most liked pattern from the November issue.
ReplyDeleteI'm working on something very similar as far as the inserts go and it's a nightmare. I end up doing most if it by hand.
You're lucky that you have already Burda in your hands. I'm still waiting!
ReplyDeleteCan't wait to see how the dress turns out!
I love this style (adored it as soon as I saw it in the magazine!) and it's going to look fabulous on you!
ReplyDeleteThis is going to look fabulous on you. My magazine just arrived in the post this morning and it is a terrific month isn't it.
ReplyDeletewhat an interesting shape on the dress, clever. looking forward to seeing it made up.
ReplyDeleteThe Nov. issue of Burda was a favorite of mine also, including this dress. I was thinking about making the part of the dress around the neck in a sheer embroidered fabric with very little structural integrity, so I was thrilled to see your pictures and the way the dress was constructed. Those lining pieces provide structure to the garment in that area. Can’t wait to see your finished dress.
ReplyDeleteOh nice! This was my favourite dress from this issue, too so THANK YOU!
ReplyDeleteI'm looking forward to seeing it finished - looks like a great dress pattern. I have yet to get my hands on the November issue. The instructions are often tricky aren't they? But like you mentioned, it does make it easier that the seams are numbered.
ReplyDeleteThis is going to be a winner for sure.
ReplyDeleteThis dress is very confusing to make- thanks for the photo sew along! I am definitely making one now ( just need to get the magazine first) Keep posting the pics and good luck !
ReplyDeleteAllison, I'm studying the front final photo, and confused as to why the lining seems to be finished inward as if it's an exterior piece, along the basted edges, when I would expect those edges to somehow be finished inside the overlay bodice. Hmm. Can't wait to see the result!
ReplyDeleteI can't wait to see this one finished!
ReplyDeleteI have not heard of the Baby Book. Thanks so much for the recommendation.
ReplyDeleteI loved this dress but the instructions made my head spin. I'm glad you are figuring it out.
ReplyDeleteDid you turn in the outer edges of the lining before basting those edges together after pressing out from the dress? I'm confused as to how they ended up finished.
This is going to be a great style for you!
Thank you! I just spent an hour deciphering the instructions - this is going to be my christmas dinner dress. Your pictures helped understand it even better!
ReplyDelete