Pages

Thursday 22 December 2011

Vogue 8527 Clutch Bags

Oh my goodness where has the month gone?  Actually I know where it has gone, into a whirlwind of parties and shopping!  There has even been a little bit of sewing but that will have to wait until the new year to see that as I still have to wrap presents and pack before we head off to see friends in LA tomorrow.

I did foolishly ask my sister in law what I could get my nieces for Christmas and she said they would love something made by me - argh not what I wanted to hear mid December with last posting dates imminent!  But I managed to whip up two bags in sparkly denim using Vogue 8527, view C.  I really like the bags, but if I make it for myself then I would add much stiffer interfacing, but for dressing up fun bags these will do just fine I hope.


Wishing you all very happy holidays and here is to another great sewing year in 2012.  I think my new years resolution will be to get more organised with my blogging!

My husband picked this apple up at our gym, I have no idea how they did it but I'm not sure I want to eat it!

Wednesday 7 December 2011

Sequinned T

Thank you everyone for the brilliant comments which really helped me make up my mind about what to sew next.  I will show you those plans in my next post because it seems even just writing down how I was feeling helped kickstart the old sewing mojo and I whipped up a top for the holidays.

Don't worry I haven't abandoned the Burda 11/11 dress, in fact stepping back from that helped me realise that all my problems came after setting in the sleeves - which are a little tight so I think they are pulling the bodice out of whack- so I am going to take them out and the dress may well end up sleeveless.

Anyway here is my holiday top, using the blue sequin jersey I bought recently.  I used a simple BurdaStyle top that I have made before (08/2009 - 117) and modified it so the front was cut on the fold and I ignored the front slit and ruffle. I also took the top in at the side seams since the original pattern is designed for a non stretch fabric.  I chose this pattern because I already had it traced and I wanted something with as few seams as possible, but any TNT tshirt or top pattern should work.


I know that this is not the generally accepted correct way to finish seams on sequin fabric, but I didn't want a 2 hour project to become a 2 month project and I think what I came up with, after a bit of experimentation, works really well.

There are two issues with the seams on sequin fabric

  • finishing the seam allowances so you don't shed sequins everywhere you go
  • stopping the sequins on the inside from scratching the skin
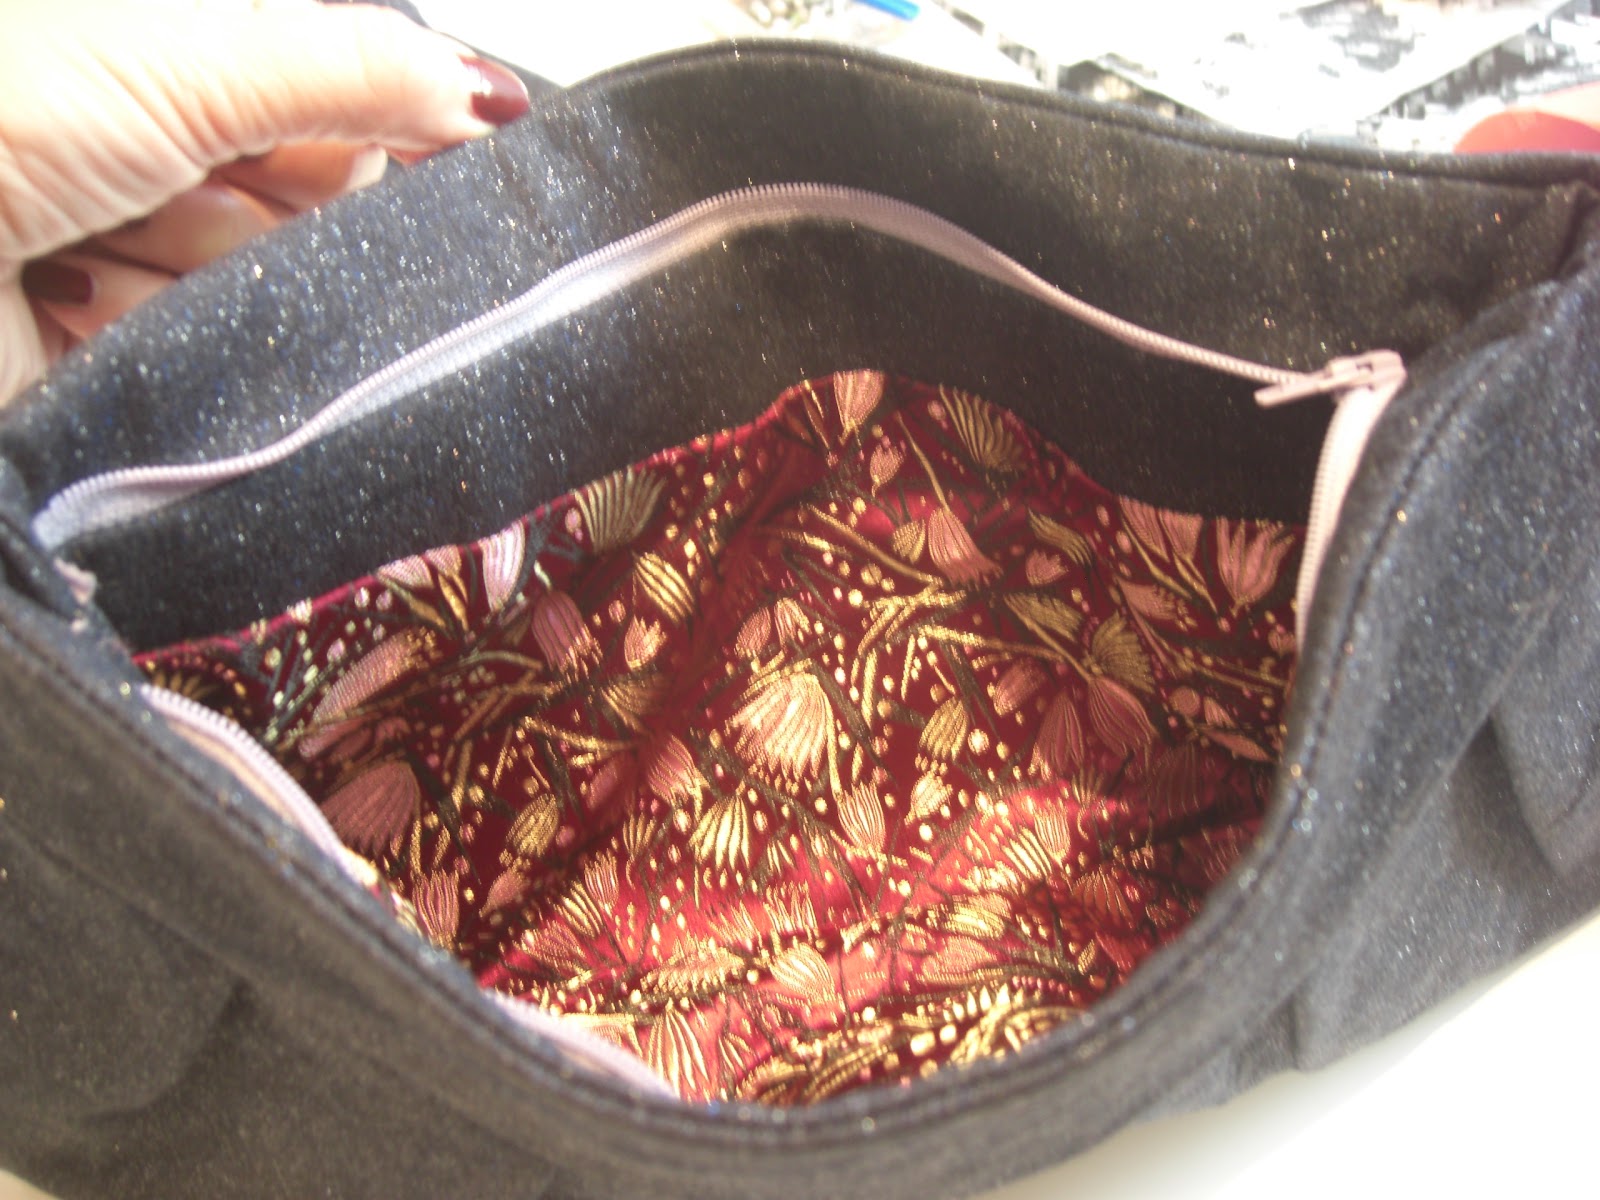
For the side and shoulder seams I cut strips of cotton jersey and just sewed them over the (fingerpressed) open seam allowances.  I did shake off the sequins that were easy to get off first (warning: you will get bits of sequins everywhere!)


For the straight arm openings and hem I also used strips, but applied them as hem facings them flipped to the inside, topstitched and trimmed the raw edge of the cotton jersey close to the topstitching.  I used a similar method for the neck edge, but cut shaped facings instead of strips.


I knocked this up on Saturday afternoon and wore it that night with dark jeans and heels.  It was the perfect thing to wear for a casual party and I got many compliments so I think this one will get a bit of wear this holiday season.

These Saturday night photos are a little dark, but you can see the sparkles, and yes one of my cats also makes an appearance again.


Me at the party with a living statue (bit nervous he'd get make up on my top!).

Thursday 1 December 2011

Back online, now please help me get back to sewing

Well I am just emerging from the dust and mess after having my floors redone.  It would have been far easier to move out for a few days, but since accommodation & storage (for both cats and furniture) are all vastly expensive here we decided to just suck it up and live amongst the mess, moving a mattress around from room to room as appropriate.  I hope I don't have to do that again, getting too old for that kind of malarky.  Anyway it's done, it looks almost exactly the same as our self levelling concrete floor did before but now in ceramic tiles which I hope will be more resilient.


Anyway everything is now connected up again so I can get online at home and catch up with all your blogs.  I also need to get myself back into the sewing room which is mostly tidy. Tidyish.  Well as tidy as it was before (i.e. a mess).

Friends, I have to admit I am really struggling with the fit on the Burda dress and it is sapping all my sewing energy.  It looked absolutely fine when I just roughly pinned it together for the photo in my previous post, but do you think I can get anything like that when I sew it for real?  It's driving me crazy.

I may have to put it aside for a week or two and work on something else, but even here I am having procrastination issues.  I really want to make some fall dresses from my recent jersey haul - here are some patterns in my stash I am considering, all thoughts and general kicks up the backside to just get on with something will be much appreciated!

BurdaStyle 06/2011-139

DKNY Vogue 1257

Vogue 8379
Hot Patterns Cosmo dress


BurdaStyle 02/2008-103 (3/4 sleeve version)

And for Robin here is the current state of my fabric stash, not too crazy but there should be plenty of inspiration in here.  The cutting surface below flips up to cover all this up if I need to hide it!


Finally, CGCouture asked about magazine subscriptions.  Personally if I could only get one it would be Burda, I use it the most mainly because it is available in english, it has it's dodgy periods but is going through a good phase right now.  Patrones (Spanish) and Mannequim (Brazilian) both really appeal to me too.  Melissa at Fehr Trade has put lots of information on the various subscriptions available so I recommend a look over there to help you decide which magazine is right for you.

Wednesday 16 November 2011

BurdaStyle 11/2011-119 Dress - Getting there...

I've discovered there are two surefire ways to get my sewing mojo going;

1) Go fabric shopping
I ordered some ITY knits from Fabric.com as it is a bit hit and miss getting them here and I really want to make some fall knit dresses.  Their prices are good enough that I can overlook the shipping costs.  I also picked up a couple of pieces locally so I certainly hope my sewing mojo sticks around for a while.

Lots of ITY knits for fall (though the crazy butterfly stuff will wait till summer)
Local purchases - sequin jersey for a top and a metallic wool for a jacket
2) Have an enforced no sewing period looming
We are having our floor retiled throughout our apartment and somehow trying to manage this without moving out so the place is going to be upside down for a while.  On the positive side it is making me have a good clearout before the workmen come next Monday.

On the back of this I am feeling motivated to get moving on the November Burda dress.  I hit Sham Shui Po today and found some perfectly matching beads that I may use on the front of the dress to cover this mess of a seam!


I've tacked the sides and zip to get the dress to a try on-able state and thankfully I like it so far and think it is going to be worth the effort it requires.  There is still a lot to finish but I feel I am on the home stretch now - here is a bathroom pic!  I'm going to a party on Saturday for which the dresscode is "blue" so I hope to get the dress finished and proper photos taken then.

Thursday 10 November 2011

Dress (lack of) Progress

So sorry for the late post, I hope no one is waiting for me!  My excuse is that the place I usually buy my zippers locally has inexplicably been closed for over a week now and so this project has lost some momentum.  I'll have to go and trek further away to get one, but won't be able to until next week.

But I did get a bit further which I hope will clarify what happens with those unfinished front lining edges as already seen in this photo;


After this you join the the front and back at the shoulder seam and put to one side.  Then stitch the darts in the upper back and attach to the upper front.  Now you attach the upper front right side to the wrong side of the dress joining along those unfinished lining edges above and continuing round the back neck.

I should add here that Burda want you to finish the seams with strips of lining as binding, but since I want to have a chance of actually finishing the dress I am just serging.  So that raw lining edge gets finished at this stage (although it looks like Burda leave it unfinished since it is hidden under the upper front).

I also understitched this seam to help stop those facing pieces from flipping out.  Then turn the upper pieces over the dress pieces and it begins to look something like the drawing.  Hooray!

Gee, this is hard to explain, Burda have my sympathies with this one - I hope these pictures help.  Please fire away if you need more pictures or explanation and I will do my best - and also bear in mind that I may have done something wrong!

Inside dress front - that previously raw front basted edge is now joined to the upper front (which is against the dressform in this view)

Close up of inside showing understitching of the facing pieces

Outside dress front after attaching upper pieces
Next we need to baste together the upper front to the facing and stitch them to the dress front - between the two corners.  I strongly recommend you reinforce the dress front around the U shape - I didn't until I realised that after so much handling mine has started to fray a bit.  Maybe you are supposed to go round the corner when you attach the facing pieces?  I think I am really going to struggle now to get a nice square corner so when I do go and buy my zipper I might try and buy something (studs, trim etc.) that I can attach over that seam to hide the predicted mess!

While waiting for a shopping opportunity I felt like working on something a little easier.  Also my Patrones subscription just came up for renewal and I was feeling guilty about not using it much so I'm making this simple ruffled tank from issue #307.  I just need to finish the armscyes and hem so I'll show you that next time by which time I should have a zip and mystery notions to finish the dress.

Wednesday 2 November 2011

On the cutting table - Burda Style 11/2011 - 119 Dress

Clearly I loved the November issue of BurdaStyle as, amazingly, I am already making something from it, dress 119.


I am making it in a - probably poly - stash fabric in a teal/black heathered sort of weave.


Only after I had cut this out and found myself completely baffled by the first paragraph of instructions did I notice this pattern is rated 3.5 out of 4 dots in difficulty.  I think now I have figured it out and am past the most confusing steps so I have taken some photos of the construction below in case it helps anyone.  You may want to hold off taking any of my advice until the dress is actually finished though just in case....!

As an overview the dress is made up of a main body with an upper front and back overlay.  Underneath that the dress bodice is partially made of lining material which is applied so that it sandwiches the raw edges of the centre front and back.  Clear as mud?  Thought so, here are the photos:


The back is shown here but the principle is the same for front and back.  Apply one pair of lining pieces right sides together to the centre edges (Burda helpfully numbers the seam to be sewn).  Then place the other pair of lining pieces right side against wrong side of the dress and stitch along the previous stitching line to create a sandwich, with the dress as the filling.  Then press both the lining pieces over the seam and baste together.

The back pieces should look like this after basting.

The front pieces should look like this after basting.

Stitch the shoulder seams, then you are ready to attach the overlay pieces.  I suspect dealing with the corners is going to be a bit tricky, I'll take some photos during that stage too.

Wednesday 26 October 2011

Vogue 8408 Dress

I really meant to get this posted up before I went back to the UK for 2 family parties, but time ran away from me.  I am now back and had a great time, but still suffering a bit from jetlag, it seems to get harder as I get older (like many things!).

I decided to make a new dress that would work for both parties, one was a casual afternoon affair and one a more formal all day marquee extravaganza.  This seemed like a good time to opt for the reliable LBD option, using the now out of print Vogue 8408.


I've had this pattern in my stash for ages and although the long sleeved version would have been more practical for the UK I also wanted to use a piece of black wool blend from my stash and only just managed to get the sleeveless version out of it.  In the end it worked out well, we had glorious weather while I was there, a bit fresh, but with beautiful clear skies.


This pattern is one of the Very Easy Vogue patterns and although it is easy to sew I think the collar could be drafted better, perhaps with more of a curve and an undercollar / facing sort of thing.  Of course then it wouldn't be "very easy" which is often the problem with these patterns.  As it is the neckline is quite bulky and sits a bit weirdly - I was not feeling the love for this dress until I hunted around a few reviews and found Trena's where she added a brooch at the collar intersection, albeit for different reasons.  Eureka!  I hopped off to H&M and bought two black fabric flower pins that could be worn either as a hairclip or a brooch and the dress was transformed!


For the more casual party I left off the extra hair decoration but wore it for the second party, my hair looked somewhat neater at the beginning of the party but of course I don't have any photos from then!


In addition I collected my giveaway book from Pin Queen and was really surprised to find she had also included 2 patterns (which miraculously I don't already own) and a cute packet of needles.  So lovely - thank you!

Tuesday 4 October 2011

Twin set and lava skirt


I am heading home to the UK for a family visit shortly and while I am there will be able to pick up the Singer Tailoring Techniques book that Pin Queen sent to my dad's house after I was lucky enough to win her recent giveaway.  Thank you Pin Queen, can't wait to get my hands on the book!  That would almost be enough reason for the trip, but in fact I am going for my dad's wife's 70th birthday party and also separately to my MIL's 70th birthday party.

Hong Kong has suddenly got cooler and the UK is having a heatwave so right now the temperatures are about the same in both places, but I know it can't possibly last until my visit so I have got started on fall sewing.

First up is a knit cotton twinset and pencil skirt from the strangest material I have ever used - none of these pieces are going to set the world alight but they will get a lot of wear both on my trip and beyond, particularly the versatile twin set.


PATTERN DETAILS


1) Knit top - Burda Style 04/2011-122


I left off the neck zipper so it is a bit of a squeeze to get it on.  The turtleneck is just cut on so it has a bit of a weird drape to it, but I like this more than I thought I would, especially with the sleeve, it feels very Japanese designer or minimalist Calvin Klein.


2) Cardigan - modified Burda Style 01/2011 - 126

I didn't have enough fabric to make this pattern properly so I used a combination of the knit top pattern above and the front drape and sleeves from this cardigan pattern to make a shorter, narrower version.  This was all a bit experimental but I like the end shape which has minimal ease.


3) Pencil skirt
I bought this fabric a few years ago in Melbourne when Vicki took me shopping.  It is very unusual, a textured stretch fabric with a slight metallic sheen to it.  It looks a bit like lava rock to me although I must admit there is a hint of cowpat to it too!  This is a self drafted pattern - just a tube skirt.  As the fabric is quite bulky and difficult to hem I just serged the edges, resulting in a scalloped finish and zig zagged a wide piece of elastic for a waistband.