Pages

Wednesday, 16 November 2011

BurdaStyle 11/2011-119 Dress - Getting there...

I've discovered there are two surefire ways to get my sewing mojo going;

1) Go fabric shopping
I ordered some ITY knits from Fabric.com as it is a bit hit and miss getting them here and I really want to make some fall knit dresses.  Their prices are good enough that I can overlook the shipping costs.  I also picked up a couple of pieces locally so I certainly hope my sewing mojo sticks around for a while.

Lots of ITY knits for fall (though the crazy butterfly stuff will wait till summer)
Local purchases - sequin jersey for a top and a metallic wool for a jacket
2) Have an enforced no sewing period looming
We are having our floor retiled throughout our apartment and somehow trying to manage this without moving out so the place is going to be upside down for a while.  On the positive side it is making me have a good clearout before the workmen come next Monday.

On the back of this I am feeling motivated to get moving on the November Burda dress.  I hit Sham Shui Po today and found some perfectly matching beads that I may use on the front of the dress to cover this mess of a seam!


I've tacked the sides and zip to get the dress to a try on-able state and thankfully I like it so far and think it is going to be worth the effort it requires.  There is still a lot to finish but I feel I am on the home stretch now - here is a bathroom pic!  I'm going to a party on Saturday for which the dresscode is "blue" so I hope to get the dress finished and proper photos taken then.

Thursday, 10 November 2011

Dress (lack of) Progress

So sorry for the late post, I hope no one is waiting for me!  My excuse is that the place I usually buy my zippers locally has inexplicably been closed for over a week now and so this project has lost some momentum.  I'll have to go and trek further away to get one, but won't be able to until next week.

But I did get a bit further which I hope will clarify what happens with those unfinished front lining edges as already seen in this photo;


After this you join the the front and back at the shoulder seam and put to one side.  Then stitch the darts in the upper back and attach to the upper front.  Now you attach the upper front right side to the wrong side of the dress joining along those unfinished lining edges above and continuing round the back neck.

I should add here that Burda want you to finish the seams with strips of lining as binding, but since I want to have a chance of actually finishing the dress I am just serging.  So that raw lining edge gets finished at this stage (although it looks like Burda leave it unfinished since it is hidden under the upper front).

I also understitched this seam to help stop those facing pieces from flipping out.  Then turn the upper pieces over the dress pieces and it begins to look something like the drawing.  Hooray!

Gee, this is hard to explain, Burda have my sympathies with this one - I hope these pictures help.  Please fire away if you need more pictures or explanation and I will do my best - and also bear in mind that I may have done something wrong!

Inside dress front - that previously raw front basted edge is now joined to the upper front (which is against the dressform in this view)

Close up of inside showing understitching of the facing pieces

Outside dress front after attaching upper pieces
Next we need to baste together the upper front to the facing and stitch them to the dress front - between the two corners.  I strongly recommend you reinforce the dress front around the U shape - I didn't until I realised that after so much handling mine has started to fray a bit.  Maybe you are supposed to go round the corner when you attach the facing pieces?  I think I am really going to struggle now to get a nice square corner so when I do go and buy my zipper I might try and buy something (studs, trim etc.) that I can attach over that seam to hide the predicted mess!

While waiting for a shopping opportunity I felt like working on something a little easier.  Also my Patrones subscription just came up for renewal and I was feeling guilty about not using it much so I'm making this simple ruffled tank from issue #307.  I just need to finish the armscyes and hem so I'll show you that next time by which time I should have a zip and mystery notions to finish the dress.

Wednesday, 2 November 2011

On the cutting table - Burda Style 11/2011 - 119 Dress

Clearly I loved the November issue of BurdaStyle as, amazingly, I am already making something from it, dress 119.


I am making it in a - probably poly - stash fabric in a teal/black heathered sort of weave.


Only after I had cut this out and found myself completely baffled by the first paragraph of instructions did I notice this pattern is rated 3.5 out of 4 dots in difficulty.  I think now I have figured it out and am past the most confusing steps so I have taken some photos of the construction below in case it helps anyone.  You may want to hold off taking any of my advice until the dress is actually finished though just in case....!

As an overview the dress is made up of a main body with an upper front and back overlay.  Underneath that the dress bodice is partially made of lining material which is applied so that it sandwiches the raw edges of the centre front and back.  Clear as mud?  Thought so, here are the photos:


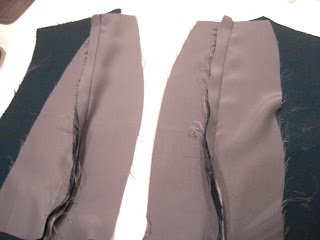
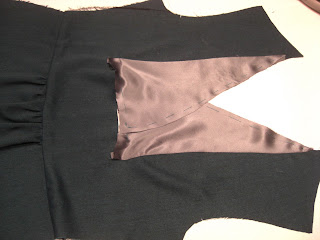
The back is shown here but the principle is the same for front and back.  Apply one pair of lining pieces right sides together to the centre edges (Burda helpfully numbers the seam to be sewn).  Then place the other pair of lining pieces right side against wrong side of the dress and stitch along the previous stitching line to create a sandwich, with the dress as the filling.  Then press both the lining pieces over the seam and baste together.

The back pieces should look like this after basting.

The front pieces should look like this after basting.

Stitch the shoulder seams, then you are ready to attach the overlay pieces.  I suspect dealing with the corners is going to be a bit tricky, I'll take some photos during that stage too.