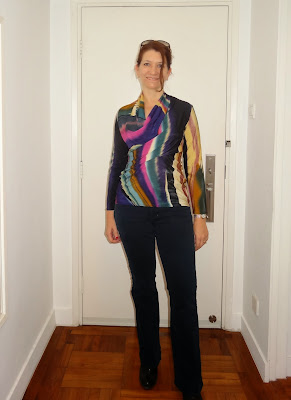
This pattern claims to be a 1 hour sew and for once I think it's actually true. It's certainly very fast and a very clever design, it looks a lot more complicated than it is. Sorry for the picture heavy post but I have made 3 versions of this so lots to show you - a New Year special offer!
Style Arc Marita Dress
That said I got stuck very early on largely because the instructions refer to the back neck facing piece which on the paper pattern is called a collar. Once I looked at the line drawing of the back of the dress and realised there was a collar and smacked myself on the forehead it was simple. I was trying to fold it in like a facing, doh! I didn't find the diagram of the whole shoulder seam/ facing construction to be very helpful, although I knew what they were getting at as it is a finish I've used in Burda and Vogue, so I took some photos of these steps.
 |
| The facing/collar is folded right sides out, stitched to the back neckline and the seam allowances pressed down towards the body of the dress |
 |
| Pin shoulder seams leaving facing/collar free for the moment |
 |
| Fold the front facing over the back collar/facing and pin. You need to get the collar edge right in the fold to get a neat finish at the end |
 |
| Stitch and finish seam |
 |
| Unfold the front facing, this is how it looks on the inside |
 |
| And this is how it looks on the outside |
The first two versions of this pattern were made using fabric I have a ton of because I bought the end of the bolt in both cases. They are both wearable muslins, but useful to determine the adjustments I needed to make in the final version. My pattern is a size 10.
Version 1 Teal doubleknit
Style Arc helpfully provide a swatch of fabric they recommend using and in this case it is quite a lightweight drapy knit. While I am happy wearing such a thin knit on my top half I find it too flimsy for my bottom half in a straight silhouette. So some experimentation was in order. Doubleknit is not the recommended fabric so unsurprisingly this version was a little bit tight, especially the sleeves and the drape is a lot more structured and asymmetrical than it is supposed to be because the side with the tuck behaves a lot differently to the side with a dart.
Version 2 Crazy ITY print top
This fabric is pretty close to the recommended weight. My friend in Shanghai bought this for me and I plan to make another version of
this maxi dress in the summer. I realise that the scale of the print is all wrong for a long sleeved top, it might work as a sleeveless version for summer, but for now I will wear it as a layering top. I widened the sleeves on this version and was much happier with the fit of them, the drape also does what it is supposed to in this lighter fabric. In a plainer fabric I think this will be a great top either with or without sleeves.
Version 3 Sensible ITY print dress
Armed with the things I'd learnt from my two experiments I cut into some ITY knit with a geometric print in great winter colours.


This is a great pattern and I am sure I will use it again. Compared to my usual Burda magazine patterns indie patterns that need shipping are quite expensive but I feel I've got good value for money here. It's quick to make, works as a top or a dress, the sleeves can be swapped out for shorter ones or left sleeveless. 3 in a row is probably enough for the moment, but I'm sure it won't be long before this comes out again.


