Pages

Friday, 31 May 2013

Sewaholic 1202 Cambie Dress

I haven't been massively inspired by the Big 4 pattern releases lately, but still needed a pattern fix.  After hearing so many good things I ordered a few patterns from both Style Arc and Sewaholic and now I have a few new things in the works.

First up the Sewaholic Cambie dress.  I am going to a hen party where the dress code is black cocktail which should be simple enough to follow, but I just wasn't inspired by anything in my wardrobe and decided a few days before the event that I needed to make something new, as you do.


I popped to a local fabric store and found this lacy fabric and when I got home my Sewaholic order was waiting for me in the mailbox - it was a sign!  I could easily have spent 2 days I didn't have mulling over which pattern to make so this was a good thing.


This pattern has been extensively reviewed and there are some great tutorials on the Sewaholic blog, but here are brief details of the changes I made - or will make next time.

The size charts put me between an 8 & 10 and since this brand is new to me I went with the 10 and used the lining as a muslin to roughly check the fit.  I also copied Sunny Gal  and changed the order of construction so that I could sew the side seams last and tweak the fit.  I ended up taking the bodice in and also shortening the sleeves at both the shoulder and bodice seams - I think next time I will start with the size 8 and shorten the sleeves and bodice a bit (fortunately I traced off the bodice pieces).

One thing to watch is the width of the neckline, I recommend leaving a bit more of the front neck seam open and then positioning the straps to make sure your bra straps won't show (this is advice I realised after the fact so I have to pick the right bra to wear with this dress).

I left the pockets off the skirt for this version, moved the side seams to the side - they are towards the front in the original pattern - and just used the width of fabric I had to cut the skirt pieces and gathered them to fit the bodice.


Although I didn't really use them I will say that the instructions are excellent and give you a very RTW construction method with no hand sewing needed.  If you know your size this is the way to go to make a new dress in next to no time.

I also changed the sweetheart neckline to a straight one and ended up removing the gathers in the sleeves, just because I liked how it looked.  You can see that the excess fabric just wrapped round to the lining side.


It's good to know there are lots of variations you can make with this seemingly simple dress and I will definitely be making more versions.


And a couple of outtakes.......

Photo bombed by my cat, Barney!


 Now I understand why people get excited by twirling shots, not easy to do!


Tuesday, 14 May 2013

Simplicity 2497 - Cynthia Rowley dress

I've made this dress twice before, a cocktail version, view C and a casual version, modified view A, the latter long removed from my closet as I wore it so much over 2 summers.  Here's the pattern:

Simplicity 2497


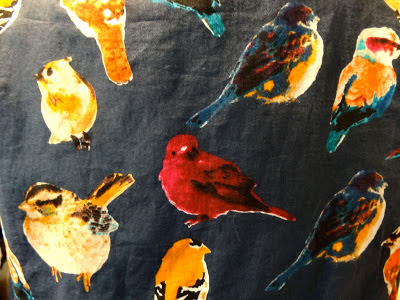
This is a great pattern so out it came again to pair with the garden birds cotton print I bought recently.


I did attempt to add piping on the bottom of the neck band to minimise the effect of cutting off some of the birds heads at the seams, but the neckband is pretty curved and the piping had the effect of easing in the fabric so much that joining the band and bodice together was an exercise in major frustration.  Then I decided to lighten up about the print and just treat it as a floral and I'm happy with how it came out despite having a few decapitated birds round my neck and waist (that sounds weird...!).


I made View A, size 12 with no changes other than adding a full lining since my fabric was on the thin side.  In my previous versions I have left out the side seam pockets but I decided to add them this time.  I must admit putting a side seam pocket where you also have a side zipper threw me a bit, but after some pinning and checking I got there in the end.

Here is the inside of the dress, the cotton I originally planned to use for the piping became contrast facings.  I actually quite like how this looks so maybe a solid version with contrast neck and waistband is on the cards.  The pattern comes with separate sleeve lining pieces which act as a stay for the puffed sleeve in view A.


Look, functional pockets!


I did wonder if the bird print, puffed sleeves and gathered skirt would end up being too cute and girly a combination for me but I really like how it turned out and I'm sure this dress is going to be worn till it falls to bits like it's predecessor.  


Tuesday, 30 April 2013

BurdaStyle 05/2012 - 110 Top

I wanted to use up the remnants of fabric I had left over from the dress I made recently, it was one of those annoying pieces that are slightly too small to do very much with and slightly too big to throw away.  I managed to just squeeze out this draped neck top from the May 2012 BurdaStyle.  I had to add a centre back seam and I also added ties in each side seam to give it a bit more shaping.

Here is the pattern from the magazine:


This is a very straightforward top to make so there really isn't anything to say about construction except that Burda suggest cutting it on the bias in the jersey version.  I've made this top before and found that in jersey the neckline drapes perfectly well cut on the straight grain so save yourself some fabric if you make this.  I also took in the side & shoulder seams at least 2 sizes so you might want to think about going down a size too, although bear in mind my fabric is very thin and stretchy.

I feel much better having used up every last bit of this fabric, but plenty more still to go from my last spree, must get sewing....


Close up of the neckline.


Close up of the ties - basically just tubes turned and caught in the side seam, I shaped them a bit so they are wider at the side seam.


I wore this to travel back from Chiang Mai home to Hong Kong recently with my denim pencil skirt.  I look surprisingly happy here given we were about to leave!


Saturday, 13 April 2013

BurdaStyle 03/2013 - 109 Lace Skirt

One of my recent fabric purchases was some mint green cotton lace which I fell in love with despite not really being either a lace or pastel person.  So I wanted to use the fabric in a way that was me and decided on a simple skirt from BurdaStyle 03/2013 - 109, underlined in black silk satin.


I did have moments of thinking it looked a bit like a crocheted tablecloth from my 70's childhood, but now it is finished I am really pleased with it.


I used interlining rather than lining so that you would not see any of the seams through the lace so although this is a simple skirt it was a bit time consuming.  (I didn't use Burda's instructions which from a quick glance I think have you put strips of the lining fabric on the edges of the lace and then make a lining as normal.)  I used the same method Amanda did when she made her lace skirt, except I didn't add a lining as well, instead just hand stitching the seam allowances to the interlining for a neat finish on the inside.  Since the interlining hangs free at the hem and is shorter than the skirt to allow the lace to show at the hem, handling the interlining at the bottom of the side seams was a bit fiddly and had to be finished by hand, mine is a bit wonky on the inside.


Instead of adding a waistband I fused a piece of stay tape to the top of the skirt, stitched on some grosgrain ribbon, folded it over and hand stitched it to the interlining.


The only other change I made was to peg in the hem a bit, I did my best to match the pattern at the side seams, but fit was a bigger priority so it isn't perfect, but definitely good enough as you can see from the photo of the seam on the inside above.

Despite the fact this is a lace skirt I think it will be wearable either dressed up or down.  Here is the dressed up version - I wore the skirt last night to a Chinese wedding reception with a black silk jacket (Butterick 5186, now out of print - wow, I made this 5 years ago!) and a mint green necklace.


Saturday, 6 April 2013

Vogue 1287 DKNY Dress - Second Time Around


I've made this dress before and when I went back to check if I'd written anything helpful the first time (no!) I saw my closing sentence was "I think I like it enough to try it in a plain solid fabric rather than a crazy print".

Well of course that didn't happen and in fact I have used a very similar print although in neutral colours.  This fabric was quite lightweight so I added a lining in the skirt.  This was just a simple rectangle which I stitched into the skirt after basting all the pleats and finishing the pockets, after that I just treated them as one layer and followed the instructions for attaching the waistband and bodice.


As I did with version 1, I inserted the elastic in the whole waistband, not just the back which helps support the skirt front better, especially with my double layered skirt.

I went to Chiang Mai in Thailand for Easter which was lovely and I made sure to pack this dress so I could get some photos of me wearing it there.  The weather in Hong Kong has been so miserable lately that although I have been sewing a lot, taking photos where you can see anything has been difficult.

That said while I have been sitting here typing this on Saturday afternoon the sun has come out (Mari - I hope you are still in Hong Kong!) so I'd better get on with taking some more photos for future posts while I can!