In the nick of time, I've finished! Completed wardrobe pics to follow in my next post.
Here's my Pattern Review
Pattern Description:
Tops A, B, C, D have gathered upper front, lower section with princess seams, sleeve and collar variation. A: stand-up collar and tie, two-piece sleeve. B: gathered sleeve with band and collar with collar band. C, D: gathered sleeve with band and stand-up collar. D: purchased trim. I started with view B.
Pattern Sizing:
(6-8-10-12) and (14-16-18-20). I made a 12, usually I need to do an FBA in woven tops but I find that the gathered bust of this pattern provides enough room.
Did it look like the photo/drawing on the pattern envelope once you were done sewing with it?
Mostly, although I changed the sleeves when I realised that although they looked cute on the dressform they did nothing for me at all.
Were the instructions easy to follow?
Yes very clear.
What did you particularly like or dislike about the pattern?
I love the waist shaping on this pattern, it's very flattering.
Fabric Used:
Cotton with some stretch, although the stretch is not required for this pattern.
Pattern Alterations or any design changes you made:
I have made and reviewed this top before, it's probably the nearest pattern I have to a TNT so I was happy to make a few changes. As mentioned above I swapped the sleeves to a simple cap sleeve. I added a belt and buckle detail to tie into my mini wardrobe by simply making 2 fabric tubes and catching them in the side seams. I had problems finding the exact buckle I had pictured in my head so was forced to get creative - this one started life as a pair of earrings! I used snaps instead of buttons so as not to clash with the buckle. Finally as the fabric is slightly see through I trimmed the front facings so they were much narrower and resembled a shirt placket.
Would you sew it again? Would you recommend it to others?
Probably (need to be careful not to end up with a whole closet full of these) and yes.
Conclusion:
A flattering, simple top pattern which can be modified to create a variety of different looks.
Saturday, 31 May 2008
Monday, 26 May 2008
BWOF 08/2003 105 Pants
Voila, the third piece of my Pattern Review mini wardobe contest entry.
These are not the same pants as in my original storyboard. This is because I had a (rare!) bright idea how I could link my pieces together to make more of a mini collection than a bunch of separates.
I decided to add a belt and buckle feature to the dress, pants and white shirt. My local notions market stalls didn't have quite the right thing and while I was pondering whether to take a trip further afield I noticed some silver earrings in the stall next door. Although these were too expensive to justify taking apart they gave me the idea to search for earrings or perhaps a belt in some of the cheaper stores. H&M came up trumps!
I decided to fasten the belts to the buckles with snaps so that I could swap out the buckles at a later stage should the perfect one appear and this also means it is possible to change them to create slightly different looks. I also changed the front waistband to have a small section in the silk dupioni that I used for the top.
Butterick 5186
This top is the second piece of my Pattern Review mini wardrobe contest. My other two pieces are well on the way and I actually think I am going to finish in time. However it is going to be tight so forgive me for just copying and pasting my pattern review here. I will post pictures of me wearing the top with my completed wardrobe later this week.
Pattern Description:
From the pattern - Semi-fitted top A, B, C in two lengths has shoulder darts, front facing, sleeve variations and one button front closing. A, B: tie ends and flounce. B: sleeve band.
Pattern Sizing:
(8-10-12-14) and (16-18-20-22). I made a 12 with no alterations.
Did it look like the photo/drawing on the pattern envelope once you were done sewing with it?
Yes, I made view B, but left off the additional sleeve band, I preferred the slightly shorter length and my fabric choices made the sleeves big enough already.
Were the instructions easy to follow?
Yes, very easy.
What did you particularly like or dislike about the pattern?
This top is an exact copy of a RTW top I bought from Zara last year. I knew it wouldn't last very long and I always planned to take it apart and make a pattern from it. So I was thrilled that Butterick saved me a job! This pattern is particularly great for beginners because the pattern pieces are very simple, there are no sleeves to set in and there are really no fitting issues due to it's boxy shape. Yet with the waist ties and the large collar you can get quite a dramatic, but versatile top. No dislikes at all!
Fabric Used:
I used silk dupioni and I interlined the main front and back pieces with silk organza. This helps to give the silk dupioni some body and resist creasing while still keeping the top lightweight. I handbasted the organza to the outer fabric and treated them as one piece. To finish the exposed seams on the inside I simply folded the seam allowances and slip stitched them to the interlining. Similarly the hems and facing edges were slipstitched to the interlining so no stitches show on the outside of the top and it also looks neat on the inside. It was quite time consuming doing all the handstitching, but worth it with these nice fabrics I think.
Pattern Alterations or any design changes you made:
Except for the very minor changes of leaving off the sleeve band and using snaps instead of a button, nothing. This is a very forgiving pattern in terms of fit.
Would you sew it again? Would you recommend it to others?
Definitely and definitely.
Conclusion:
I love this top and will be making it up again in a more casual fabric for summer.
Monday, 19 May 2008
BWOF 2008-02 dress 113
Here is the first item in my mini wardrobe. Only 3 pieces and 12 days to go. .... Still even if I get nothing else done, I am really pleased with this dress!
So onto the next 3 items! Did anyone see the cute post on the PR message boards from a lady who was worried she was a slow sewer because she only made 2 tops and a skirt in 4 hours?! Gee it takes me that long to decide what to make next - I should send her a plane ticket!
You can see that I changed the proprtions of the skirt considerably, probably breaking all kinds of rules. I lengthened the skirt panels by around 6 inches - the dress actually looks pretty short on the model in the magazine but I think her legs must be about 10 foot long. Then I shortened the flounce to around half as deep as it was supposed to be - I didn't have a great deal of choice at this point as I was a bit short on fabric - those flounces really eat the yardage! I also have not added a belt because I think it will get a bit lost anyway on this rather loud print.
I traced a 38 at the bodice, tapering out to 42 on the hips and did a full bust adjustment on the upper bodice. I am glad I took the time to make a muslin of the bodice, I'm really pleased with the fit. You can see the adjustments I made here.
Toya asked if I would be lining it - I know from her blog she is a fan of nice neat linings so I am sorry to say that no, I left it unlined. This is partly because it is a stretch cotton and I could not find a compatible lining, and also the bust section after my adjustments was very curvy (!) and I didn't want to have another layer of fabric with princess seams. The inside is finished with all in one neck and sleeve facings which I know many people hate. I can see why, finishing the shoulder seams on the inside neatly took a lot of pressing and hand sewing to look nice, but I got there in the end. I used an invisible zipper and finished the top with a hook and thread bar. Here's some pictures of the inside:
Vicki was wondering why I wasn't using the co-ordinating fabrics I recently purchased for this mini wardrobe. This print is from that little splurge, but being a bit of a novice at this wardrobe planning business I couldn't make the plans I have for the other pieces of fabric fit into the constraints of this contest. I thought about using the denim for some jeans but I think that is a project I want to take my time with and not have to work to a deadline. But I will definitely be working with those pieces soon and they will not be wardrobe orphans!
So onto the next 3 items! Did anyone see the cute post on the PR message boards from a lady who was worried she was a slow sewer because she only made 2 tops and a skirt in 4 hours?! Gee it takes me that long to decide what to make next - I should send her a plane ticket!
Thursday, 15 May 2008
Pattern Review Mini Wardrobe Plan
Alrighty lets commit my mini wardrobe contest plan to "paper" before I talk myself out of it. My concept here is Double Duty Basics - since the mini wardrobe is just that at only 4 pieces I wanted to create pieces that can be dressed up or down for a variety of looks and that will co ordinate with other pieces I already own & future projects.
The dress fabric is a stretch cotton print, I've made a muslin of the bodice, lengthened the skirt part, cut it out and have started sewing the front panels together. I think this will be quick to make (it sure needs to be!).
The blouse is a TNT and will be in a self striped white cotton, this is cut out and I know I can make this fairly fast too.
The remaining jacket/top and pants are where I may come unstuck. Both are new patterns and I don't even have the fabrics yet. I need to purchase some black silk dupioni for the jacket/top and some cotton type fabric of the pants. I'm planning to purchase those tomorrow and hopefully get the dress finished too.
Wednesday, 14 May 2008
I'm back
Can you tell I had a good time?!
I wore my recent BWOF jacket as a blouse this time to travel in and it was really cool and comfortable. Here's a better picture of it taken while waiting for the taxi to take us to the airport.
On a more serious note, I was shocked to hear on my return about the earthquake in China. The charity I work for (Animals Asia Foundation) campaigns to end bear bile farming and we have a rescue centre in Chengdu which provides a home for 150 workers and over 160 bears. Fortunately none of our 2 or 4 legged residents were harmed although some buildings on site have been damaged. There are thousands of others not so lucky though, it really is a tragedy.
On sewing news I have been enjoying catching up with sewing blogs and am looking forward to getting back in my sewing room. I am still planning on at least attempting my mini wardrobe and I should get plenty of time to work on that (i.e. start it) this weekend - I will post about my plans next time.
Monday, 5 May 2008
BWOF 2003/08 -125 Skirt
Thank you everyone for the comments on the red jacket/top. It was fun to make something a bit different.
Finally I have got my camera back! I rashly promised ages ago that I would model some of the garments that I made in the last month or so while the camera was out of action and I promise to do that just as soon as I get back from my short vacation.
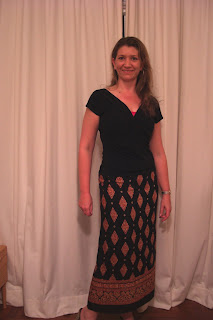
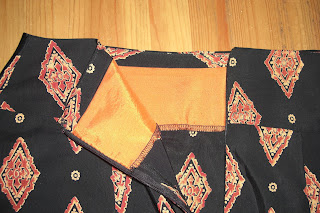
Tonight I finished up a quick to make skirt in a remnant of border print fabric from my stash. Got to make room for the new stuff! This is pattern 125 from BWOF 08/2003. I only noticed it while flicking through my file of line drawings. I needed a straight skirt pattern to utilise the border print, but didn't really want to have a split in it (only because in lightweight fabric I find they have a tendency to stick out and I didn't want to fuss with it too much) - so this one with a single gore in the back was ideal. Incidentally the line drawing turned out to be incorrect in that this skirt should have a centre front seam and be cut on the bias, but I went ahead with it anyway. I used the non border part of the fabric for the back gore since it has a curved hem.
So, together with the 2 black jersey tops I made recently this is my nano-wardobe! Speaking of wardrobes, I've also been planning what to make for the mini wardrobe contest on PR and realistically it is going to be tough for me to finish in time after I get back, but never mind. I don't want to just make 4 quick pieces just to finish, I want to use this contest as a gentle introduction to wardrobe planning. I will post about my (current) plans next time. For now, here's some pictures of the finished skirt which I will definitely be packing in my suitcase!
Me wearing it - can you believe I spent a good 5 minutes deciding which shoes to wear, then cut them off anyway!
Back view on my dressform. I topstitched the godet so that it hangs more like an inverted pleat - you may be able to see that in the detailed shot of the godet. I literally used the last scrap of this fabric and didn't have enough to make the waistband facing so I used a strip at the top and pieced it to some contrasting lining fabric. For the same reason, matching the fabric at the yoke seam was an impossibility, but I can live with that, it will be hidden most of the time anyway.
Subscribe to:
Posts (Atom)