Thank you all for the comments on the bridesmaid dress, I'm not sure if I am generous or just a bit of a nutcase, I must say it is nice to be able to get back to planning fall sewing for me and I have made a few simple pieces off my list that I will post shortly.
So before I forget how to do it, here is the technique I used for the narrow baby hem on the satin bridesmaid dress. I did actually start by experimenting with my narrow hem foot, but ditched that idea pretty fast when I realised that I have a huge learning curve ahead of me there. Something for another day...
I was inspired by a Threads article (Issue 145 "Bias on the Edge") on applying bias facings to armholes and I think it may be the same method used by Susan Khalje since she refers to 3 lines of stitching, but I am not sure as I don't have all her books (yet!). This method is only slightly different to my standard approach, but the results are far superior. Hopefully you can spot the difference, but below are samples of the old way (top) and new way (bottom).
You will need to test a sample to see how far from the finished hemline to put your first row of stitching (basically the width of the first fold, but the measurement will vary depending on the fabric). Anyhow here is the basic method with photos;
 |
| Stitch a row of stitching just below the finished hemline. |
 |
| Fold on this stitching line and press. |
 |
| Stitch again very close to the fold. This is the extra row of stitching and it makes all the difference. |
 |
| Trim as close to the second stitching line as possible. |
 |
| Fold over and press again. |
 |
| Stitch again - I found the finish to be better if you don't stitch directly on top of line 2. |
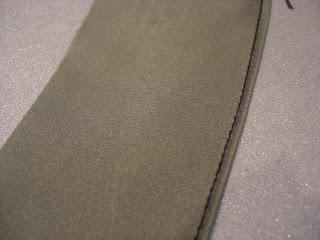 |
| Finished front side. |


Hi,
ReplyDeleteTHanks for this technique. I have used this approach with two lines of stitching, but you are right. The extra row of stitching and trimming would make the whole process SOOOO much neater. THanks, this is something to add to my list of techniques, especially helpful when sewing for my daughter. I am new to your blog but have been enjoying it. I have a sewing and knitting blog at:
withneedleandstick@blogspot.com
Susan
That looks so much easier than how I was trying to do it before. Thanks for the great tip!
ReplyDeleteBeautiful hem, and it has just enough weight to keep the fabric from rolling to the right side.
ReplyDeleteThis is the way I do baby hems too - its almost foolproof. I find the rolled hem foot really difficult on curves - is it just me?
ReplyDeleteI learned this technique a while ago at a silk workshop. It is sooooo much easier than using a rolled hem foot.
ReplyDeleteDid you find the trimming too awful? That's why I've avoided this method. I hate trimming! I have to admit, though, the final result is superb.
ReplyDeleteLove this technique. I still have trouble with my rolled hem foot, although getting better. However, on curves or some material, it's just too hard. I'm going to have to try this. Thanks for sharing.
ReplyDeletePerfect! I prefer that method for binding the armscye and absolutely love that you used it to hem. I'm adding a link to this post in my blog's how to section. Thank you!
ReplyDeleteYour technique is wonderful! I have been sewing professionally for 30+ years, and have done many narrow hems, but this makes them so much easier & neater. The bridesmaid's dress I just finished looked great. I treated myself to a pair of Gingher duckbill applique scissors, 50% off at Joann last week, which make cutting very close to the second line of stitching very easy.
ReplyDeleteThis comment has been removed by a blog administrator.
ReplyDeleteThis comment has been removed by a blog administrator.
ReplyDelete